Specs:
So this PowerMac popped up in my eBay feed a couple weeks ago. A dual 450MHz Gigabit Ethernet G4 tower. It was sold as not powering on, and was missing the RAM and hard drive, but pictures of the machine also showed it was missing the GPU so I got them to agree to a small discount. The base price of the machine plus shipping at that point was about $58 after taxes.
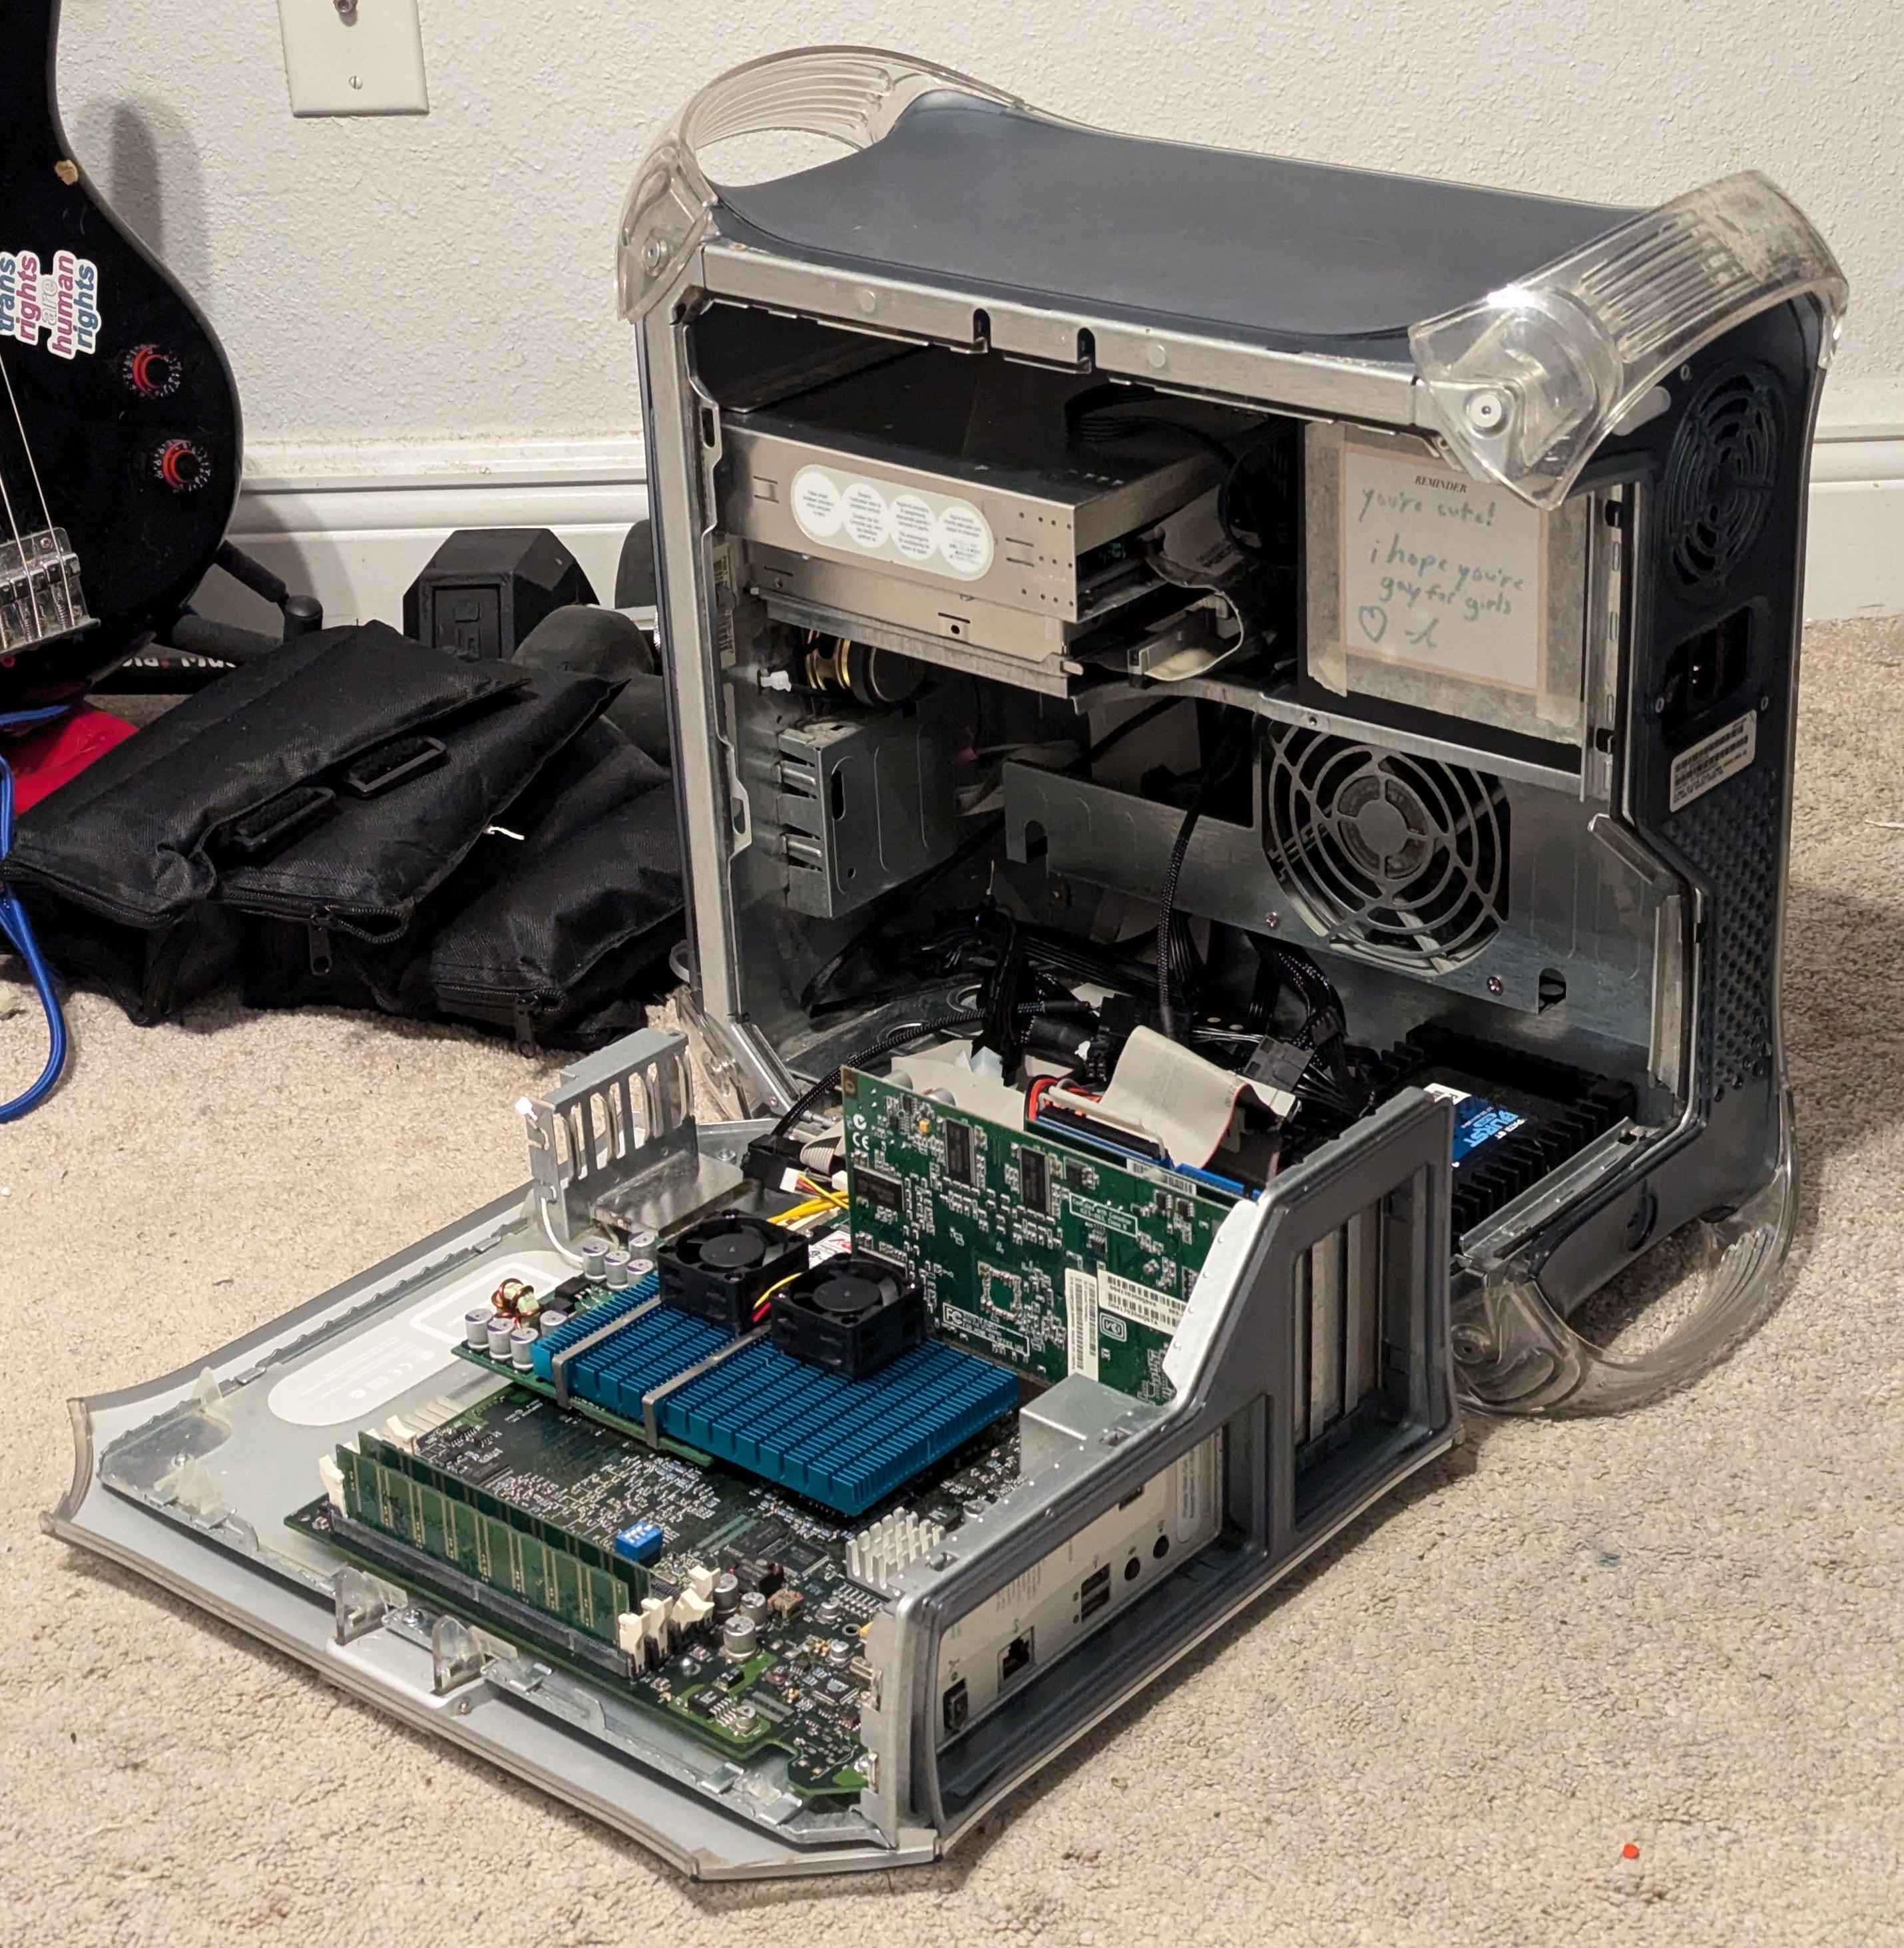
The machine arrives on Wednesday the 22nd of May, while I was in shambles from having my heart broken, I might add. I open it to discover a Sonnet Tempo Ultra ATA/66 controller card which doubles the number of ATA channels available in the system, which is great, and I get a piece of Sonnet hardware which is a retro Mac mainstay. I plug it into the wall... and the power light on the front ignites, but no sound comes from the speaker. It flashes three times which I know from other Macs means a memory error, so I go fetch my SDRAM modules from the partial Y2K era build and turn it on again, this time I get a dim white power indicator which means it's on. Great!
It was also the fucking filthiest machine anybody I showed it to had ever seen. Absolutely caked with dark colored fluffy dust bunnies, but also coated in a very consistent layer of dry brown/gray dust. The CD in the optical drive was some kind of portfolio CD for a company that made custom keychains and was dated to 2014, and it had a corporate inventory label on the bottom of the machine, so it may have lived a very long life driving a company's laser engraving table before being retired and then sold on to me.
I started buying parts and upgrades almost immediately, including finding a very vague listing for a Radeon 9000 Pro that was a Mac original item based on the photos, but the seller had zero idea what they even had. I got it for about $48, which is half of what other people want for them. This would have been the GPU out of a VERY late Mirror Drive Doors G4 tower and there's not a lot better you can do without spending hundreds of dollars on a GeForce 4 Ti or hacking up and flashing PC graphics cards that I don't have. It's a pretty ideal GPU for the type of Mac that this is, considering good OSX support and being one of the last GPUs fully supported by Mac OS 9. I also bought an 867MHz G4 CPU card out of a Quicksilver PowerMac G4 from Apple Rescue of Denver, which may well have been the very last one they had. That one's going to require some very interesting hackery to make work as well. It cost $33 including shipping.
As I begin to take it apart for cleaning and discovering the depth of dirt that had made its way into the system over the last 24 years, I discovered that the optical drive was made from the horrible beige plastics of doom! Just trying to clean the thing made it begin to crumble, clips shearing off at the slightest provocation and pieces of the tray already rattling around inside the drive. I made the executive decision to replace the drive, which wouldn't cost much since it's a simple DVD-ROM/CD-RW combo drive. I found one on eBay for $12, which should be here today, the 3rd of June, but I also took the challenge of trying to replicate the tray and have a replacement 3D printed in clear resin. That part should arrive in a couple of weeks, but I am not counting on it to function correctly, as it is a first attempt.
Since the speaker was totally cooked, incredibly quiet and crackly, I decided to hack apart a set of USB speakers and splice wires together to restore a working speaker into the case, putting a small 40mm circular driver in the front where the old one used to be, and WOW. That little speaker has never sounded so good. It's probably due to going from a small plastic box to a large metal enclosure, so there's a lot more room for bass frequencies to resonate.
The GPU arrives in the mail and I throw it into the machine to test, and it works just fine, but I had discovered that the power supply was probably on its way out. It needed to sit plugged in for a few minutes before it would come to life, which was a bad sign, but I persisted. I used my Dell 19" 900p monitor to test it out using my iBook G3 as a boot disk over FireWire 400. My monitor doesn't like whatever display signals the system is spitting out when it's not booted into an operating system which caused some confusion at first but I wasn't that concerned. I tried out a few games, including Halo CE, Tron 2.0, and booted into OS9 to play Diablo II for a bit. Everything seemed to be working, and the speaker sounds fantastic! I don't even feel the need to hook up my desk speakers to it.
Then come about 2 days later when I try to turn it on after installing internal storage and a clock battery into the motherboard... and it won't power on anymore. Damn it. I assumed the power supply had failed and started to look for solutions. Turns out it's fairly similar to an ATX power supply so a simple adapter would solve the problem, with the potential loss of some functionality unless diodes are added and 5v standby is moved to another pin. So, I went ahead and bought even more things, including a power supply with large enough 3.3v and 5v rails to make up for the old PSU's relative strength in those areas, as well as an extension to make an appropriate adapter. A case fan, to let me get one with a standard plug and not some special weird one like whats coming out of here, and some equipment to more properly mount the new SSD.
The total cost of this project has ballooned to over $300 so far and I am not even done. The system can be pushed further, of course.
To make that 867MHz G4 from a Quicksilver run at something close to its intended speed, I would have to overclock the system bus, which by default runs at 100MHz. The Quicksilver's ran at 133MHz, meaning that CPU in this machine, once the ATA connector for the optical drive is removed, would run at around 650MHz. I found an old article from around 2007 that talked about a footprint for a DIP switch on the motherboard near the RAM slots. This DIP switch controls the system bus speed, and is usually hard set with 0 ohm resistors on the back of the motherboard. If these are removed, and the switch installed, the system bus can be safely pushed to at least 120MHz, which would naturally run the 867MHz CPU at 780MHz. The CPU, of course, can be overclocked further. To speeds including 933MHz, 1GHz, and 1.06GHz, which on the 120MHz system bus would run at either 840, 900, or 955MHz. I'm not sure which settings would be stable, though a one step bump to 840/933MHz would probably be safest.
Of course the 867MHz CPU has its own cooling challenges. The heatsink for the dual 450MHz Sawtooth processor card does not fit on the 867MHz Quicksilver processor card. There's capacitors in the way, and the die has a couple of millimeters of length sticking out from under the contact surface. This was a problem, of course, and could be fixed with the application of power tools and shims, but I don't have the tools I'd need.
Application of calipers (if you're a tinkerer and don't have them, go get some, they're great) revealed the mounting hole spacing for the processor card's heatsink was actually 79x79mm square... and that's incredibly close to both the old LGA1366/20xx spacing at 80x80mm, and the current LGA1700 spacing at 78x78mm. I'm fairly certain that a low profile server cooler for LGA1366 would fit the processor card nearly perfectly, and honestly would be overkill for cooling the CPU, which probably doesn't have a maximum power draw over 35W after consulting the data sheet for the 7450 G4.
So uhh, yeah. This is turning into a pretty cursed project that would be totally invisible from the outside. But then you open the case and get to have a "what the fuck" moment when you look over all of the weird things going on inside.
After some testing with calipers and pieces of foam and plastic to determine heatsink clearances, the maximum height of a heatsink from the cooler's coldplate to the top of the fins or fan can only be about 15 millimeters. That rules out the vast majority of even the lowest profile LGA13xx/20xx heatsinks as they have heights in the neighborhood of 25 to 27 millimeters. Which would be great, except I would need the case open all the time, or to cut metal to make room for it where the ZIP drive would normally go. I'm drafting solutions for a custom heatsink intended to fit within the clearances of the case without destructive modifications.
Things people already knew that I didn't until I saw them: How brittle beige plastic gets after 25 years, and how tight the tolerances are inside of a Sawtooth generation PowerMac G4. There's less room in there than you'd think. Everything fits together like a puzzle box, the gap between the heatsink and the RAM is for the optical drive to fit into, and the steps in the heatsink are for the ZIP drive to fit into. It's intense. I don't know why they didn't put the CPU in the back from the beginning like on later G4s.
In repair-related news, the AresGame AVG750 power supply arrived yesterday while I was at work and I was able to install it and try testing it. Of course, it didn't work. Not right away. There's a couple of pins that need swapped or jumped.
The Power Macintosh G3 "Blue and White", as well as the early "Yikes!" and "Sawtooth" PowerMac G4s use a PSU that's 95% 20-pin ATX compliant. All it needs is for a 3.3v wire to have its position swapped with the PowerOK wire to allow it to self-monitor. This signal was not used on PowerMacs, but PC power supplies require it to function. This makes Early PowerMac adapters very easy to construct.
Gigabit Ethernet and Digital Audio PowerMacs are slightly more complex, using a 22-pin connector. Including one additional ground pin and a +28v rail to power ADC monitors. The 3.3v/PowerOK swap still needs to be made, but the +5v Standby signal (on this architecture called "trickle power/TRKL") has been combined with the +28v ADC monitor power rail instead of remaining in its usual spot, which is now a N/C pin. For some reason. Because Apple, I Guess.
The Quicksilver changed a bit further with two +25v ADC power pins, one of which housed trickle power as well, and a 4-pin CPU power connector that's reversed in polarity from a standard PC supply. The MDD uses a completely unique pinout on a 24-pin connector.
I was under the impression that this signal would only be needed to make sleep work reliably, as without it the machine would freeze when it tried to wake back up due to not keeping the RAM powered, but when I plugged the system in with the 3.3v/PowerOK swap only, it wouldn't power on until this rail was connected too. Clearly I'm not going to get +28v with a PC power supply, so I piped the +5vSB into the +28v/TRKL pin, did the 3.3v/PowerOK jump, and it boots fine. Immediately too, instead of requiring a 3-5 minute warmup beforehand.
For now this is using jumpers made from the clipped off ends of bass guitar strings jammed into the back of the PSU connector, but once my tools and ATX 20 to 24-pin adapter show up on Saturday, the 8th of June, I will rip those out and install a proper shielded power connector into the system. This was just a temporary measure for testing purposes. I have an OS installed now, cloned over from my G3 iBook just the way I did with Cinderella.
On top of that, because the fan connector was on the old power supply which is no longer working, I grabbed SATA to 4-pin fan adapters and stole one of the EK Vardar X3M 120mm fans out of my modern PC desktop. I really need to gut that thing and remove the watercooling hardware because it's more of a maintenance hassle than anything to me at this point, but that's a project for another time. That fan is not as high airflow as the old one, roughly 67CF/M instead of 87CF/M, but it has a more pleasant acoustic profile and is more static pressure optimized for moving air through radiators, which I feel is probably better for the type of ventilation this thing has... which is panel gaps. The system seems to be getting plenty of airflow both in and out now, so in terms of repairs, adapter construction is all that's left.
The original optical drive has been replaced with a more durable and likely faster model produced in 2005, the missing hard drive was replaced with a 120GB SATA SSD on an IDE adapter and 3.5" drive carrier for mounting, a Radeon 9000 Pro GPU from an MDD PowerMac G4 has been added, which is the most powerful GPU a system like this can leverage without massive spending on a Mac native GeForce 4 or modifying PC GPUs, the fan was given a capable modern replacement, and the power supply has been replaced with a modern semi-modular unit, which likely makes it far more efficient and quieter than it ever was.
This machine is gonna sit as it is for now. I have some plans for future modification and upgrades but they can wait. Future plans include:
I need to be conservative with my spending for a while, so the current state of refurbishment is probably absolutely good enough. Oh, and she has a name now, too. Hela. Because she's been such hell to work on. Part after part after part breaking down and failing. A $58 computer has ended up costing nearly $330 in the end, and nobody would ever buy it for that price. She's my cursed piece of shit PowerMac and she will live with me for the rest of time.
I spent a lot of time last night and the night before designing heatsinks for the Quicksilver CPU card, as it would be positioned inside of my GBE G4 motherboard, or on any Sawtooth for that matter. The first draft I made was just a heatsink with a fan strapped to it and "idk" locating pins with a copper shim to make the heatsink reach the CPU without hitting the mounting screws. It's since evolved quite a bit. I've made three revisions since with another experimental one on the way. One is designed to use a 97x33mm centrifugal fan, and the next is designed to use a pair of 40x20mm centrifugal fans. Both are positioned on top of the shroud, blowing air into a baffle that pipes it down into the heatsink.
The third is probably the most practical. It's got space for two 40x20mm axial fans at the back that can be either in a push or pull configuration, and I have an idea for a version designed to be as short as possible for the entire length of the sink, which would use two 40x10mm blower fans you often see advertised as parts for 3D printers to maintain a sub-15mm height throughout, like a single slot GPU blower.
On all revisions, it uses only flexible clips to secure the heatsink and fans into the shroud, as well as position itself over the card, while it will re-use the original spring clips from the Dual 450MHz heatsink for mounting. The heatsink itself is roughly $9, copper shims a few dollars, the fans around $13, and the shroud itself would be less than $25 to get 3D printed. It's shaping up nicely.
Oh, and my pin extraction tools have shown up as well. My extension cable is expected to show up tomorrow, so at that point, repairs will be fully complete.
I have arrived at home, the adapter showed up, my needed modifications were well known in advance, and they worked just as well as the trimmed guitar strings did. It's just that it's not bare wires anymore. I'll probably make a write-up of the things that are needed to be done to it, as the ATXG4 site only exists as a backup on the WayBack Machine at this time. Maybe I'll even offer to build them for people, now that I have most of the tools required.
I took the time, now that the power supply and other replacement parts are roughly in their final form, to go ahead and cable manage the thing some. Get the CPU 8-pin leads tucked out of the way and tied together until I'm ready to do something with them, zip tie the fan cable and 24-pin PSU cables to take up the extra length, and re-route the optical drive cable to eliminate the need for an extension to make it reach the bottom of the board. The results, I would say, are pretty good.
It needs a couple of easy upgrades for now, like adding more RAM and a better wireless card than the 802.11b AirPort wireless card that is actually the official solution. There's PCI based ones that support both MacOS and 802.11g that I will have to look at getting my hands on. After that, it would be time for the hard modifications and engineered heatsinks to enter the picture.
After midnight last night I made the decision to just... crush a clock resistor on the motherboard. I saw in the diagrams that the bus clock speed jumpers were possible to increase just with removing them, so I decided to go with the one clock setting I knew would be a litte safer and go from 100MHz to 120MHz. Guess what? It worked. But only kind of.
It made it through an XBench run with a clean 20% increase in the CPU score and either slight improvements or no change everywhere else. Problem is, it's not the most stable. Turns out early G4s, the 7400 silicon on this card, doesn't like being overclocked by 20%. It is incredibly crash-prone at 540MHz. This could be a cache voltage issue but I'm not sure how to fix it because information on clock speed settings and voltage settings on early G4 cards are all on dead links and ancient broken forums. My Quicksilver card should fare better.
Speaking of that, I looked a little closer at it to see what kind of overclocking options might be accessible to me on there and it's not even what I thought I bought. The one I selected from Apple Rescue of Denver was an 867MHz card, which would have a 6.5x multiplier by default. What I have is a 733MHz card with a 5.5x multiplier. I know this silicon can probably be pushed to 1GHz, and the jumper for that is easily accessible with the addition of a small strip of copper tape, but it might need more core voltage to make it there, and I'm not sure how I would manage that. The guides are easier to find for this, at least.
I took the IDE header off the other day. After practicing with some crusty capacitors on my Socket 462 motherboard, I decided that hot air would probably the method I would go with for it, considering the number of pins I would have to worry about. I masked off the plastic part of the connector and small nearby SMD componentry with foil and kapton tape, though it wouldn't help THAT much. Plenty of flux, a few minutes of hundreds-of-celsius degree air baking the area, and gentle downwards pressure with some tweezers made sure it came off mostly cleanly. I did lift a few pads but considering I don't intend to use this connector ever again... I'm mostly okay with that. I can get another Gigabit Ethernet motherboard for $30 if I ever wanna restore this to a more original configuration.
Last night, I decided to put the new CPU in to test it out. I needed to reset the PMU, jury-rig a +12v source for the CPU, and perch a small AMD CPU heatsink on top, but it was stable at both a 5.5x multiplier of the standard base clock of 100MHz and the overclocked setting of 120MHz, giving CPU speeds of 550 and 660MHz. I couldn't get the 7.5x setting to take just by bridging the pads with copper tape, so I will need to find a resistor around a value of 1000 ohms and put it on there to try and do it the correct way.
I've sharpened my one set of tweezers in preperation for the future SMD soldering work.
OKAY
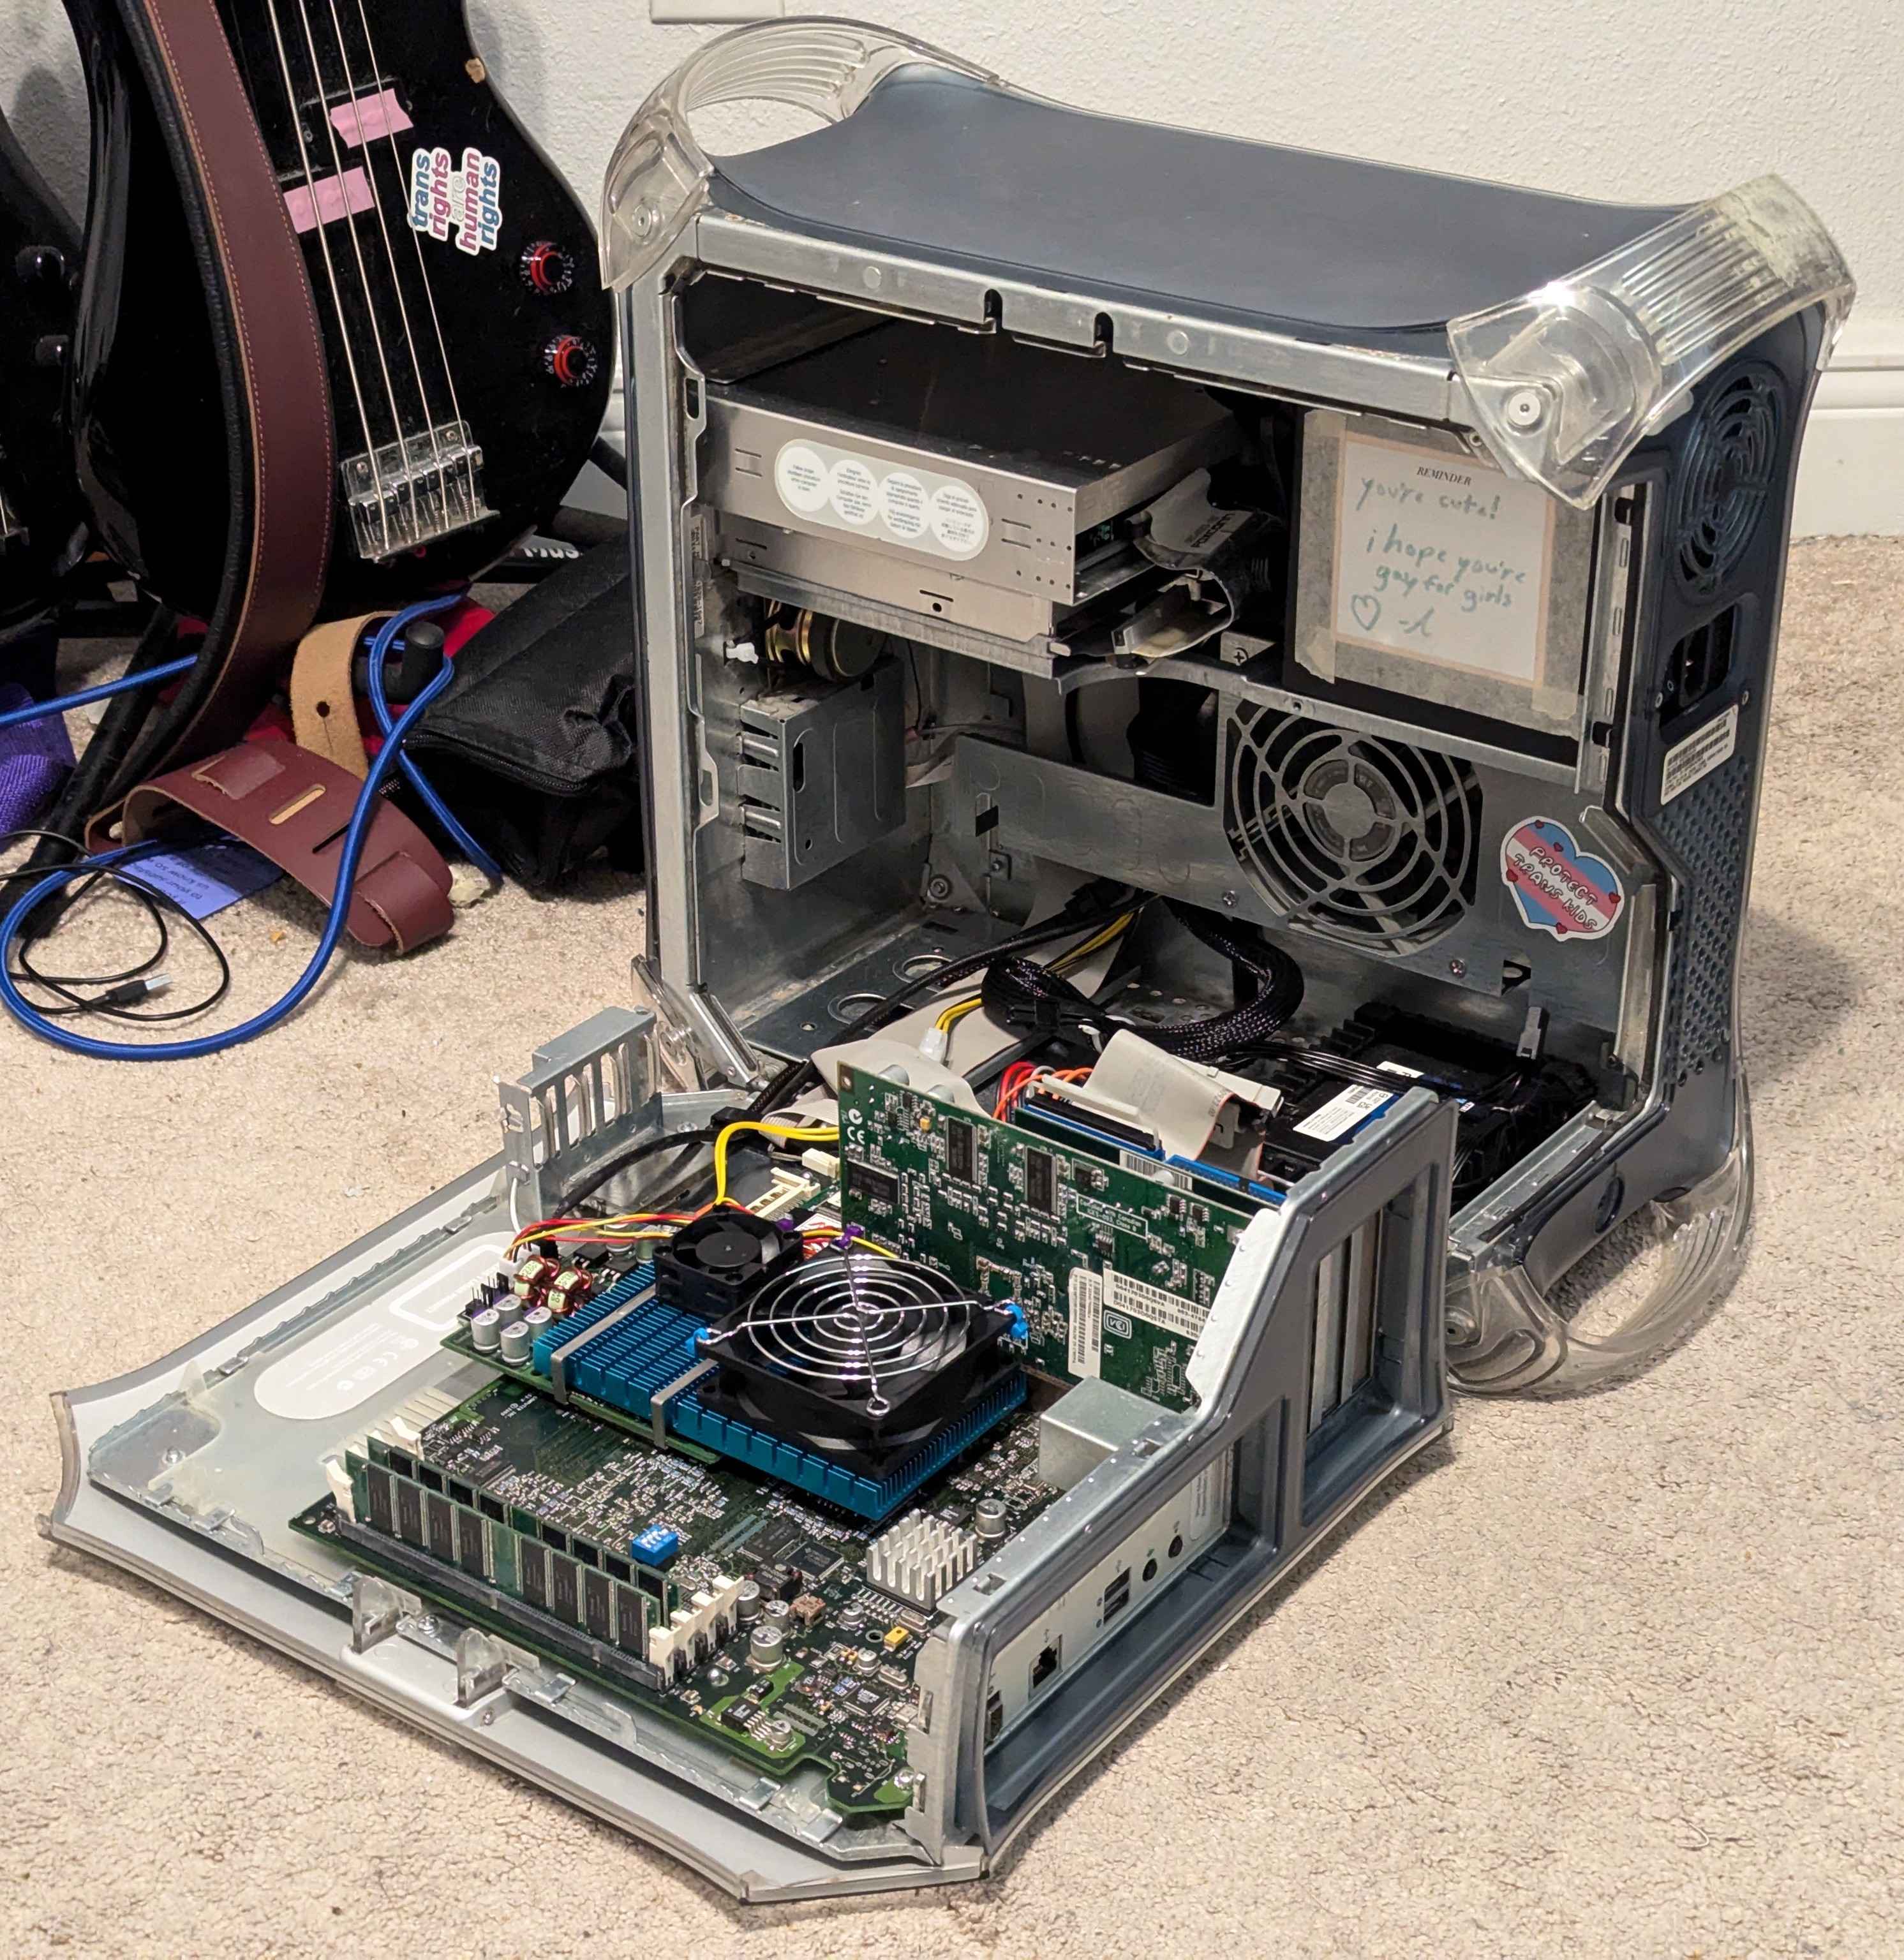
A lot of my supplies showed up earlier than I expected. You can now see in Hela's beauty shot that the new CPU is installed along with the custom heatsink, which is constructed from an off-the-shelf 85x150x12mm aluminum heatsink with a short 40x0.5mm copper shim attached together using a layer of thermally conductive adhesive strips and cooled with two 40mm axial fans attached with screws and padded with soft foam behind the hub. It's running at the default 5.5x multiplier of the 120MHz system bus, because it wouldn't post with the 133MHz bus. So 660MHz.
I also installed a Noctua NF-P12 Redux fan to replace the EK fan with one that has more airflow and is quieter, and installed a DIP-8 socket into the motherboard. It currently has a DIP switch in it to make switching between system bus settings easier. I'll build the breakout board soon too. For now, I'm just glad I can close it up, lol. Having three fans on three separate SATA to fan header adpters is a little annoying, though, so I'm just waiting on a fan hub for those. It should be here tomorrow.
Once the new CPU gets here I'll try and push it to the highest speed available, which should be 960MHz.
The fan hub arrived and solved a lot of my cable management woes, but I ran into some more issues with the overclocking endeavors.
The new CPU I ordered has a 2MB external level 3 cache which I didn't account for in my heatsink design. The 12mm tall heatsink that's in there now combined with a 0.5mm copper shim and a 0.2mm layer of thermal adhesive is already a little thicker than these stock cooler mounting straps were designed for, and I'm gambling when it comes to being able to close the case if I go any thicker, so I decided to pick up another heatsink. It's the same color, only 1cm narrower, and the same 150mm length, but the height is only 10mm as opposed to 12mm. This provides me room to build a taller contact patch in an attempt to clear those regulators. I also bought an 80mm fan to try and get even more airflow over the sink than the two 40mm fans can provide, and it should work wonderfully.
The new card hasn't quite come yet but I did some more experimentation with overclocking and voltage settings on my 733MHz CPU. As it turns out, the system's unstable with a 120MHz system bus regardless of the CPU settings. I pushed the CPU from its default 1.9 volt setting to a 2.05v setting and it still wouldn't run stably at even 720MHz, let alone 780MHz. So I set it back to a 5.5x multiplier, yet continued to run into issues with the system crashing in games, when navigating folders in Finder, or even failing to boot at all.
At first I thought I might have had a dud CPU that couldn't be overclocked at all, but that didn't make any sense to me. If it WAS a CPU issue, then why would it not run at BELOW it's rated speed of 733MHz? It should have been perfectly stable at a 720MHz clock speed at that point and not even require any voltage modifications. Then I turned my attention to the motherboard, and the RAM.
I don't think the motherboard is the issue here. Sawtooth, and by extension, Gigabit Ethernet G4s, are seemingly incapable of running at a 133MHz system bus. The machine failed to post, throwing a three-beeps memory error code. Incompatible or undetected RAM. A LowEndMac article from 2005 showed this error happening on an AGP sawtooth and mine seems no different. But a 120MHz bus seemed to work fine for them.
Then I decided to try something a bit more drastic. Keep the higher voltage setting and set the multiplier to 8x on a 100MHz bus. Suprise-no-suprise, it will run at 800MHz at 2 volts ALL DAY. Benchmarks, games, whatever I want. And it's faster than it's ever been alongside being more stable.
I thought back to when I was experimenting with my Athlon XP system and when Windows requested a floppy diskette which I have no drive to put it in, and then TWO different Linux distributions [Mint and Void 32-bit] failed to boot several times... with memory related kernel panics.
Current operating theory: This RAM is just crap
Looking closer at it, the memory modules are from... "Lifetime Memory Products", with S80032LLCTW memory ICs from a maker called "SPECTEK". I've never heard of them. Maybe that's for good reason. Maybe this memory is just awful at functioning unless it's greatly underclocked. By 25%, in this case. Maybe it can't even handle running at 90% of the rated speed. Throwing errors and causing instability in not one, but TWO different machines and four operating systems with greater-than-100MHz system buses definitely points to that possibility.
I wanted to get more memory anyways. So I went to a reliable source of seemingly new-production vintage-spec RAM who I've bought from before, Memory Masters, to get a 1GB kit of PC133 SDRAM. These have Elpida memory chips, which is a brand name that I actually recognize. Maybe it'll be a little more reliable.
Weeeeelll I couldn't leave well enough alone. I was trying to demonstrate to some discord homies how loud the fan on my Athlon XP heatsink is and I decided that maybe I'd try and find a good place to get lower voltages to quiet down some of the other fans in my machine, mostly thinking about the smaller ones. Then I got curious about what voltages I could find in other places as well.
Then, suddenly, the system shuts down, makes a kinda... sizzly sound? Aaaand now it won't turn on. Great.
What I apparently did was short the input and output of the CPU voltage regulators together, most likely sending +12v directly into the CPU and killing it. Back to the dual 450s until the eBay seller sends me the 867 with the cache. Apple Rescue of Denver also got back to me and gave me a partial refund for the CPU I bought from them due to the difference in speed between what I thought I was buying and what I actually got. I immediately took that and put it towards another Quicksilver G4 CPU, this one says it's another 733MHz card but the jumpers on the back tell me it's at a 933MHz setting, a 7x multiplier.
We'll see which one gets here first.
The 1GB memory kit from Memory Masters arrived first, and it absolutely proved the barrier to a faster system bus was the memory. Even with my stock dual 7400 card installed, running on a 120MHz bus pushed it to a STABLE dual 540MHz speed and even gave it the highest performance statistics it had ever achieved in benchmarks like Cinebench R10 and Geekbench 2.2.0. All that remained was to wait for the new Quicksilver card to come so I could bring the system back further than even its previous heights.
The custom fan duct arrived next, which I mentioned on my 7th of June update. There are four issues that are either annoying or prevent it from working.
I've already sent for a second revision that should address all of the issues, and even sprung for the express shipping. So in a week or so, I should have it in hand.
Thirdly, the 733-turned-933MHz CPU card absolutely did arrive before the 867, which still hasn't been sent out. I filed an "Item Not Delivered" complaint with eBay so I have a couple days left before I am able to have them step in. As for my suspicions about the modifications made to the 733MHz card, I was absolutely right to assume it had been modified. Two of the resistors on the bottom of the card were not matching with the other two, even at the same value, and I don't believe Apple ever sold a 933MHz model without the L3 cache. The 733 and 800MHz models, absolutely, and an education-only 867MHz one, but not the 933MHz ones.
After MUCH experimentation, I was able to push it to 840MHz on a 120MHz bus, allowing for a much faster single core experience, and even a usable web browing experience. At least on simple sites. I'm actually writing today's update from Hela!
It doesn't seem to want to push up to that tantalizingly close 1GHz barrier, though. I even discovered the secret to multipliers higher than 8x, which are FAR easier on this PCB than the previous one. No matter which system bus speed I tried, whether it was 1080MHz @ 9*120 or 1000MHz @ 10*100, nothing would POST and display video after the card was reinstalled, and in the 900 to 950MHz range the system is highly unstable. So 840MHz it is, until my custom 1.5GHz or better accelerator card is assembled.
The beauty shot has been updated as well, as I did get another fan that, while not as quiet as the 120mm Fractal Design fan, does have a higher CFM rating and is more appropriately sized to the heatsink I'm using.
I was looking back at the things I've done to this machine and I don't think there's anything I haven't changed about it.
It's kind of sad to see the project so close to finishing, honestly. But it had to happen at some point, right? The path to any further improvements lies in flashed PC graphics cards, additional RAM, and 7447 CPU upgrade cards pushing well beyond the 1GHz barrier. Maybe sometime I will get there, but now is not that time.
Signing off for now, y'all. Be good to each other, lol
Hela has been a back burner item while I worked on the 744x/1 accelerator card. The second revision of the shroud worked great, it's been nothing but stable, and now I have another idea for the slowest POSSIBLE G4, which I will call G1/4 (get it, haha). I do have another project that needs some of her parts though, so for now the system bus is back at 100MHz, the old RAM is back in it, and it awaits a massively underclocked G4, somewhere around 200MHz.
For now though, keep an eye out for Melanie, the orphaned badass I will be restoring into an anti-sleeper.
Melanie has also been put off because I found a cheap quicksilver on eBay that claimed to be broken but really wasn't. It's just too expensive for me as things stand. I got some extra RAM out of it and upgraded Hela to 640MB while the Quicksilver is now maxed at 1.5GB, but put the Radeon 9000 Pro into the Quicksilver, swapping the GeForce 2 MX into Hela until I can get something better still.